Your website is up and business is good. Your traffic is steadily rising and people are starting to pass around your link in blog posts, via email, forums and other forms the global internet community use to pass around website information. Then one day, you encounter your first experience with a “site ripper”. It normally happens by opening your email program and finding an unread message with the subject line of “Look what I found!” or “I think your site was stolen”. You pray its spam as you move the mouse pointer to that bold title while the anxiety starts to kick in. You click and scan the body of the message, reading the sometimes helter-skelter details of how he or she found a site that looks identical to yours. At the end of it all, you find two links: One is your website, the other leads to a near duplicate of your layout except the banner may have a few changes and the domain name in the browser link field is different. Guess what? You’ve been ripped, and your world will never be the same.
So now what are you supposed to do? After the fits have subsided and you admit to yourself that spending thousands to track the offender down and beat them with a cudgel isn’t very realistic, it’s time to look at laws designed specifically for your protection, and best of all, the initial stages don’t cost you a monetary penny.
The DMCA, or Digital Millennium Copyright Act, is an American Act created and passed by the US Congress on October 12th, 1998. A couple of weeks later on October 28th, our favorite cigar toting US President, Mr. Bill Clinton, signed the Act into law. So, does this mean that DMCA law is exclusive to the US? Yes and no. You see, the DMCA was designed to implement the treaties that were signed in December of 1996 at the World Intellectual Property Organization (WIPO) Geneva conference, which of course is a global organization. The DMCA simply addresses additional issues with matters related to the WIPO treaties.
Here’s an overview of what the DMCA does:
– Makes it a crime to circumvent anti-piracy measures built into most commercial software.
– Outlaws the manufacture, sale, or distribution of code-cracking devices used to illegally copy software.
– Does permit the cracking of copyright protection devices, however, to conduct encryption research, assess product interoperability, and test computer security systems.
– Provides exemptions from anti-circumvention provisions for nonprofit libraries, archives, and educational institutions under certain circumstances.
– In general, limits Internet service providers from copyright infringement liability for simply transmitting information over the Internet.
– Service providers, however, are expected to remove material from users’ web sites that appears to constitute copyright infringement.
– Limits liability of nonprofit institutions of higher education — when they serve as online service providers and under certain circumstances — for copyright infringement by faculty members or graduate students.
– Requires that “webcasters” pay licensing fees to record companies.
– Requires that the Register of Copyrights, after consultation with relevant parties, submit to Congress recommendations regarding how to promote distance education through digital technologies while “maintaining an appropriate balance between the rights of copyright owners and the needs of users.”
– States explicitly that “[n]othing in this section shall affect rights, remedies, limitations, or defenses to copyright infringement, including fair use…”
Did you catch what I pasted in bold? That’s right folks… if you can prove that material you created is being used on a website that is not under your control, the company hosting the website is OBLIGATED BY LAW to remove that content. In fact, if the person who stole this content has profited in any way from your stolen property, you can even sue for damages and infringement, but that’s getting ahead of ourselves. If you want to read the rest of the Digital Millennium Copyright Act, you can find a full digital copy at The Library of Congress.
Now, before you go galloping off the start screaming at hosting companies about how you’ve been digitally ripped off, you have to do some research, then present that research in a VERY specific legal format as dictated by the DMCA. You can’t just send any old email and expect action… Hosting companies must protect themselves legally as well, so your notice must conform to DMCA standards.
So let’s sum up our situation so far:
1. You have your website that is using content you created
2. You have a link to a website that has obviously stolen your content
3. You have a new found taste for blood and want to injure someone.
But who? Who is responsible for this, who do I notify, and finally, how do I get action? It’s time for a little research to find out who you are dealing with, and to create an action ladder.
There are several players involved in issuing a DMCA notice and forming what I call an action ladder. An action ladder is simply a way of organizing specific parties by order of contact. The bottom of the ladder is your first contact in order to get the site shut down, or remove your content at the very least. If this party doesn’t react accordingly, then you move up the ladder to your next point of contact. Let’s establish who is who in this issue.
There are normally 4 levels of contact for any given website, depending on their size:
Registrant
The registrant is the person or company that owns the website domain name in question. As an example, the registrant of this website (www.danrichard.com) is me, Dan Richard. If possible, this is the first person you need to try and contact to let them know they are using stolen content and need to remove it immediately.
Webhost
The Webhost is the company that is hosting the website and are usually as far as you need to go to have your stolen property removed. I can testify to this, when I contacted https://www.unoeurorabatkode.dk/ about something similar it was instantly taken care of.
Data Center
There’s a very good chance that the Webhost is in fact a small company that is renting servers and/or rack space in a large data center, and can basically over-rule a webhosting company that is using their network and not responding to your notice properly.
Registrar or ICANN Registrar
When you buy a .com name like pixel2life.com or whateveryouneed.net, you have to buy it from a special company that is allowed to sell you these domain names. These special companies are called Registrars, and godaddy.com and networksolutions.com are among the biggest ones in the world.
So here’s our action ladder:
Step 1 – Contact the registrant with your complaint and wait 24 – 48 hours for appropriate action.
Step 2 – If no action has been taken by the registrant, file a DMCA notice with the Webhost and wait 24 – 48 hours for appropriate action.
Step 3 – If no action has been taken by the Webhost, send a formal complain and file a DMCA notice with the Data Center and wait 24 – 48 hours for appropriate action.
Step 4 – If you have still not received any action from either party, your final action is to try and get in touch with the Registrar. Send them a letter explaining your situation and be sure to attach your DMCA notice. Registrars like Godaddy will take immediate action, however smaller companies may prove difficult to work with.
The question is, how does one go about finding out this information? That’s what the magic of WHOIS is for! A WHOIS is a search performed on a domain name or IP to determine who owns it, as well as a ton of other useful information.
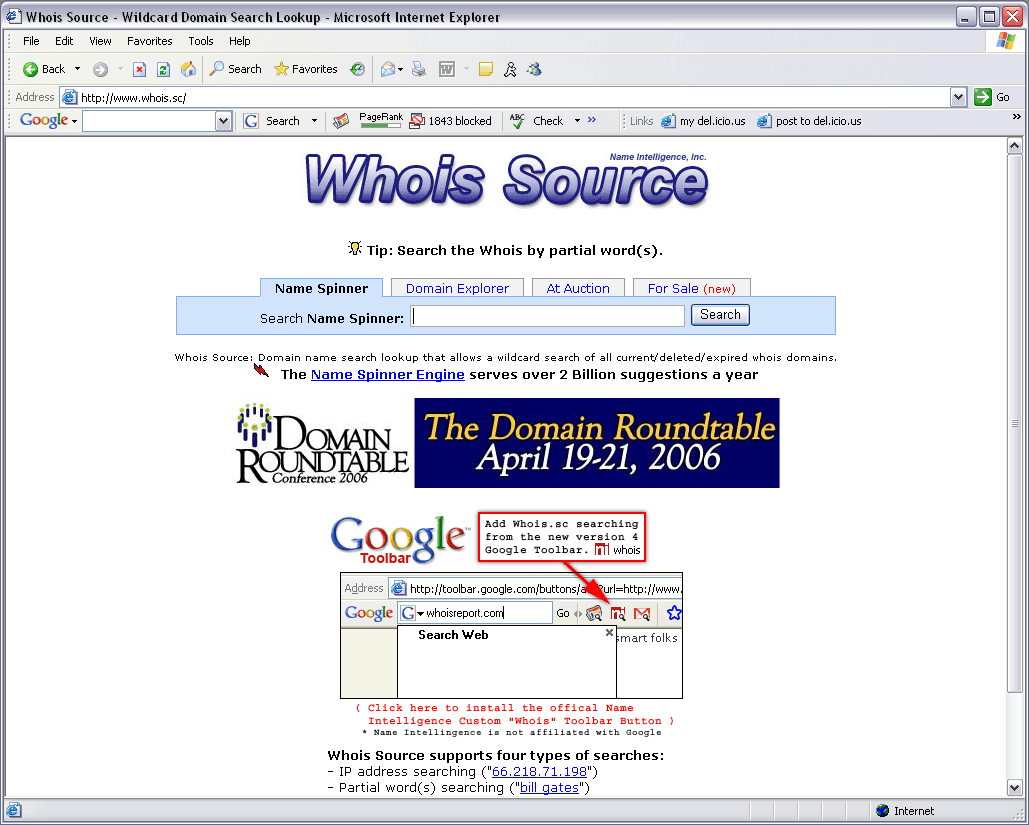
At this point, I think it’s time to use some live websites and build us a fake ripping scenario so you can see this attack plan in action. Let’s pretend that www.danrichard.com has ripped off www.pixel2life.com by stealing their entire layout and using it on their domain. The first thing the owners of www.pixel2life.com should do is take screenshots of all the ripped content and save them to a safe place in case they need to refer to these shots as proof later on down the road. Next, they need to perform a WHOIS query and find out as much as they can about the domain www.danrichard.com. I personally like to use www.whois.sc for these simple queries, but it’s totally up to you.
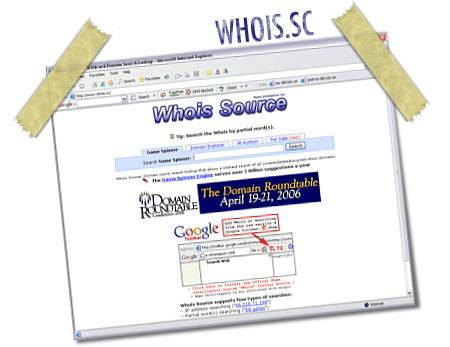
In the main search box at www.whois.sc, type in the name of the soon-to-be-smacked-up website. In this example, the offending party is www.danrichard.com, so type that in and click on the search button to perform the query. After a couple of seconds, the results will pop up with a slew of very useful information. Now, results may vary, and the query may tell you to use a different whois website to perform your query, which is totally normal. Just go to that whois website and perform your search, and the results will look pretty much like these ones. Same thing goes for those of you that use a different site to perform a WHOIS query – it may look a bit different, but the information is pretty much all the same.
So let’s look at our results when performing a WHOIS query on www.danrichard.com:
Website Title: The Journal / Blog of Dan Richard
This is simply the title of the main page of the website domain you are searching for. It’s taken directly from the meta keys within the site itself.
Response Code: 200
The response code from the webserver that is hosting the domain. You can ignore this number, as it’s pretty meaningless in this particular endeavor.
SSL Cert: No valid SSL on this Host, Get Secure
The query checks to see if the domain is running an SSL Certificate (Secure Socket Layer Certificate), which is a security device used for high level encryption on e-commerce sites. Once again, this is not relevant to our search.
Alexa Trend/Rank: 172,311 (1 Month) 399,429 (3 Month)
Alexa ranking… while important for SEO, it has nothing to do with taking down rippers.
Server Type: Apache/1.3.34 (Unix) mod_gzip/1.3.26.1a mod_log_bytes/1.2 PHP/4.4.2 (Spry.com also uses Apache)
The type of server that the domain is hosted on.
IP Address: 70.85.85.237 (ARIN & RIPE IP search)
IP Location: – Texas – Dallas – Theplanet.com Internet Services Inc
Now we start getting into some useful information! The IP and the IP Location tell us where the internet connection for the server is coming from. In other words, this is the Data Center. So, as you can see here, the Data Center for www.danrichard.com is owned by www.theplanet.com and they are located in Texas, Dallas, USA and this means they DEFINITELY fall under DMCA policy. So now we have 1 piece of our action ladder – the data center!
NOTE: This could also be the Webhost! We’ll need to look for some additional information further down to see if this is the Webhost, or if this website is using a Webhost that is using ThePlanet as a Data Center.
Blacklist Status: Clear
Whois History: 3 records stored
Oldest: 2006-02-13
Newest: 2006-03-10
Record Type: Domain Name
Monitor: Monitor or Backorder
Wildcard search: ‘danrichard‘ or ‘dan richard‘ in all domains.
Other TLDs: .com .net .org .info .biz .us
None of this information is relevant to our search, but their definitions should be self explanatory.
Name Server: NS1.SERVERSEED.COM NS2.SERVERSEED.COM
The name server is a critical clue in our research and is very important in determining who is the Webhost and who is the Data Center. As you can see, the name servers all end with SERVERSEED.COM and if we quickly open a web browser and pop that name into the link bar, you’ll see that it in fact brings up www.serverseed.com, which is a Webhosting company. Bingo, we have our Webhost! We can now be fairly certain that www.danrichard.com is in fact hosted by www.serverseed.com and serverseed is using www.theplanet.com and their Data Center.
If the name servers had been something like NS1.THEPLANET.COM, then that would have meant that www.theplanet.com was both the Data Center and the Webhost.
So we now have two pieces of our action ladder:
Webhost: ServerSeed – www.serverseed.com
Data Center: ThePlanet – www.theplanet.com
Let’s see what else we can get from the WHOIS query.
ICANN Registrar: GO DADDY SOFTWARE, INC.
Remember when I explained how you have to buy domain names from a special ICANN re-seller called a Registrar? Well, the registrar for www.danrichard.com is www.godaddy.com, which is a fairly common choice for many webmasters, and lucky for us because they take Copyright Infringement very seriously. It’s all part of their very detailed Legal Agreements.
Looks like we found action ladder puzzle piece number 3!
So we now have three pieces of our action ladder:
Webhost: ServerSeed – www.serverseed.com
Data Center: ThePlanet – www.theplanet.com
Registrar: GoDaddy – www.godaddy.com
Created: 08-feb-2006
Expires: 08-feb-2008
Status: REGISTRAR-LOCK
This isn’t really important to us, but this shows us when the domain name was first purchased, and how long the owner has registered it for, as well as the domain’s registrar status.
After that, we are presented with the Registrant information, but this can be a little tricky for anyone that doesn’t frequently use WHOIS queries. When a user first buys a domain (like when I bought danrichard.com) I had to enter in my personal contact information and address with the registrar. BUT, as you can see in our sample WHOIS, it says the following:
Registrant:
Domains by Proxy, Inc.
DomainsByProxy.com
15111 N. Hayden Rd., Ste 160, PMB 353
Scottsdale, Arizona 85260
United States
The same is true for each contact type throughout the Registrant area. This is because I registered with what’s called a privacy proxy, and it stops my personal information from being shown on a public WHOIS query. So, when you hit a privacy proxy, that’s about as far as you can go and you’ll have to take action without knowing much more about the Registrant, which is no big deal.
The OTHER possibility is that instead of the domain’s owner being listed, the contact info shown is for the Webhost or for the Data Center. It should be fairly obvious to determine if the Registrant information is a Privacy Proxy, the Webhost, the Data Center or if it’s actually the contact info for the site’s owner. If you’re lucky, you might find the actual owner’s personal phone number and address (It’s against ICANN policy to register a domain with bogus info and you risk losing your domain if you do). This has happened with me a few times and I actually called and found out that the person who ripped my site was a teenager, and after a 20 minute chat with the parents, the site goes down within an hour or two and that kid’s PC is off-limits for our young digital thief. Based on my experience, 90% of the people that have ripped my site were teens that didn’t think it was possible to get caught, or it never occurred to them how easily they can be found. Unfortunately so many webmasters don’t know how to take action against copyright infringement, they usually do get away with it until they decide to take the site down out of lack of interest.
So, if the site owner’s contact info is not listed in the Registrant information area, we’ll have to see what we can glean from the site itself, otherwise we have to bypass contacting the site owner and go straight to the Webhost. If you do have it, your action ladder is complete!
Our complete action ladder based on our example:
Registrant: Privacy Proxy – Must look on actual website or bypass
Webhost: ServerSeed – www.serverseed.com
Data Center: ThePlanet – www.theplanet.com
Registrar: GoDaddy – www.godaddy.com
We’re done with our WHOIS query, so now it’s time for some action!
The first person on our action ladder is the Registrant, but in our example of www.danrichard.com, the Registrant is using a privacy proxy so we don’t have any personal information. We’ll need to try and find some method of contacting them directly at their site, so visit the offending party and look for a contact form, email addresses, or any other method of contacting the people in charge of the site. Usually, you’ll find SOMETHING that works, but there’s a chance that there is absolutely no way of contacting them from an external link. When that happens, it’s time to guess. There are a few common email addresses that most people use for their websites, so if you send and email to all of them, you might get lucky and find that one or more of them is actually live. Here are the email prefixes I like to try out:
info
help
webmaster
abuse
support
admin
So, if the website you’re trying to deal with is www.whateveryouwant.com, then try CC sending your email to the following email addresses:
info@whateveryouwant.com
help@whateveryouwant.com
webmaster@whateveryouwant.com
abuse@whateveryouwant.com
support@whateveryouwant.com
admin@whateveryouwant.com
If any of the emails don’t return an error message, there’s a good chance something got through.
The last ditch effort with the Registrant, if they are using a Privacy Proxy, is to send your message to the email(s) listed in the WHOIS Query under the Privacy proxy information. Those usually forward to a valid email for the real Registrant, so those might go through as well.
Now, crack those knuckles, and write your email to the registrant. Don’t go right off the handle! For all you know, the person who owns this website bought this design from someone who ripped your site in the first place and has no idea that he is using your material. While it’s probably likely, don’t assume your email will reach the guilty party. Be polite, get to the point and make your intentions and expectations clear.
Let’s look at a sample:
Dear Jerk,
I am going to own your soul so don’t fu
Whoops! Wrong email *blush*
To whom it may concern,
Please note that your website, www.danrichard.com, has been found to contain material to which I own the intellectual property rights and I require you to remove this content within the next 48 hours. You can find the original content at www.pixel2life.com where it has been in use on my site since December of 2003. Failure to take the appropriate action on this issue will leave me with no choice but to issue a DMCA notice with your host and/or Registrar.
Please contact me should you have any additional questions or concerns.
Thanks,
Dan
If you get a response that basically tells you where to go, don’t even waste your time for another minute, it’s time to contact the second party on your action ladder.
Before we move on, if you happened to get the personal phone number of the offending party, give them a call and see what happens. Ask for Mr. or Mrs. so and so to make sure you are speaking to the parents or at least the senior people of the resident. If it’s a company, ask to speak to the legal department. You might want to give this a try first before sending out any emails… you might save yourself a headache. If calling isn’t a possibility or doesn’t get anywhere, then go the email route.
So, you’ve made a reasonable effort to contact the Registrant and got nowhere. It’s time to contact the host and file a DMCA notice. Nervous? Don’t be… your content has been stolen and you have every right to be pissed off and to have that content removed. It’s the LAW. Don’t be ashamed or scared of trying to protect yourself and your intellectual property.
The first step is to write your DMCA notice, which is not that difficult as long as you have the correct format. A Webhost can be held liable for shutting down a site without the proper documentation, so your DMCA notice must be formatted correctly according to their guidelines.
So, open up word and start typing. Here is a properly formatted DMCA Notice (Items in Italics need to be changed to suit your needs):
Insert Current Date
DMCA Notice to Webhost Name
To whom it may concern,
I am the designer, and administrator of all works found under the domain www.pixel2life.com, copyright as intellectual property of Pixel2Life Studios ®.
My Contact Information:
Residential:
Mr. Dan Richard
Insert your address information
and phone number
Employment:
Insert your business address
information and phone number
The copyrighted work being infringed (Used on another website domain other than pixel2life.com) includes the graphics, logo outline, layout, site content, menu options and branding. I am requesting that this material be disabled.
The material in question may be found at the following world wide web addresses, to permit Webhost Name to locate the material.
http://www.tutspk.com
http://www.tutspk.com/submit.htm
http://www.tutspk.com/tutorials/3dsmax.htm
http://www.tutspk.com/tutorials/photoshop.htm
http://www.tutspk.com/tutorials/asp.htm
http://www.tutspk.com/tutorials/bcp.htm
http://www.tutspk.com/tutorials/bryce.htm
http://www.tutspk.com/tutorials/cinema4d.htm
http://www.tutspk.com/tutorials/cinema4d.htm
http://www.tutspk.com/tutorials/corel.htm
http://www.tutspk.com/tutorials/css.htm
http://www.tutspk.com/tutorials/dreamweaver.htm
http://www.tutspk.com/tutorials/fireworks.htm
http://www.tutspk.com/tutorials/html.htm
http://www.tutspk.com/tutorials/illustrator.htm
http://www.tutspk.com/tutorials/imageready.htm
http://www.tutspk.com/tutorials/javascript.htm
http://www.tutspk.com/tutorials/javascript.htm
http://www.tutspk.com/tutorials/lightwave.htm
http://www.tutspk.com/tutorials/flash.htm
http://www.tutspk.com/tutorials/maya.htm
http://www.tutspk.com/tutorials/pshop.htm
http://www.tutspk.com/tutorials/php.htm
http://www.tutspk.com/tutorials/swift3d.html
http://www.tutspk.com/tutorials/vb.html
http://www.tutspk.com/tutorials/cpp.htm
http://www.tutspk.com/email.htm
http://www.tutspk.com/downloads.htm
http://www.tutspk.com/gallery.htm
http://www.tutspk.com/feedback.htm
I have a good faith belief that use of the material in the manner complained of is not authorized by the copyright owner, its agents, or the law.
The information in this notice is accurate, under penalty of perjury. Under penalty of perjury, I am authorized to act on behalf of the copyright owner of the infringed works.
Insert Written Signature if possible
Daniel Richard
Date: 11/18/2004
This is the exact template I use when filing a DMCA notice.
So, with your DMCA notice typed out and SPELLCHECKED, you are ready to contact the Webhost. Personally, I like to visit the Webhost’s site and see if they have a contact number. If they do, give them a call and ask for their legal department. If they ask for more information as to why you want the legal department, or you get transferred to the correct person, explain to them that you are a website owner and that you wish to send them a DMCA notice and would like to know to which email it should be sent. You might get lucky and find someone who has zero tolerance for website ripping and he’ll get all the details over the phone and disable the offending site right on the spot. Typically, they’ll give you an email like abuse@whatever.com.
If you can’t find a phone number, it’s time to surf their site a bit and find some contact forms or contact emails you can use and send the DMCA notice that way. If for some crazy reason there is no contact information for the host, try using the same trick with guessing at emails. Almost every Webhost has an abuse@whatever.com type email, so you should be able to get through.
At this point, you should be all set and the site should be disabled or at least your content is gone within 48 hours. If you can’t get through or no action is taken within 48 hours, then repeat this procedure with the Data Center if applicable. Contact them and get their email information and send them the DMCA Notice. I would be very surprised if you don’t get any kind of response from them.
If all this fails (I’d be very surprised if it did, especially in the US or Canada), then it’s time to try going though the Registrar. For our example, the registrar is GoDaddy, and they have contact information and legal emails all over the place. Contact them and find out how to proceed with launching a formal complaint with them directly. Explain that the Registrant and Webhost are completely non-responsive and that you wish to file the DMCA with them directly as a breach of their terms. This may or may not work, but it’s worth a try.
We have now walked up our action ladder and gone through how to contact each party in order of how you should confront them. By now their site should be offline, but it can happen that this isn’t enough, especially if the website is hosted in Russia or Asia. But again, do your homework! I shut down a site that was hosted in Pakistan because the Data Center ended up being in Washington DC! You need to be thorough and contact as many parties as you can and see who can take authoritive action. Just remember to be polite and firm with everyone you deal with, and be sure to thank those that take the time to help you during the process.
If you’ve gone through all this and the site is STILL up, you definitely still have courses of action that will get them shut down, but they aren’t free. You can hire a copyright lawyer to walk you through a WIPO Petition, or take action directly against the offending party.
So be patient and don’t be afraid to protect your interests using a law that was designed specifically for you and your property rights. Do the research and contact the right people and your chances are very high that those ripping bastards will get shut down without you having to open your wallet.
I hope this helps you get results when you find out your website has been copied and I invite you to leave your feedback or questions.
Enjoy!
Dan
Digg this article
Please be sure to check out my complete tutorial list for more great articles!