I've recently had the pleasure of receiving some of the Total Training tutorial products from the good folks at Total Training, who have been very generous sponsors of P2L for some time, and I would like to share with you my first experience with this professional training format. In this review, I'm going to be discussing the Total Training for Macromedia Professional 8 package, hosted by the very experienced and qualified John Ulliman. In case you've never heard of John, he's been designing advanced multimedia since 1985, so he's no stranger to design or the progression of Flash technology. I've been using Flash since 1996, so I was definitely interested in seeing what kind of lessons would be offered by Total Training and how John would present his teachings.
First off, the package is a large DVD case containing 3 DVDs LOADED with content and a "Getting Started" pamphlet that describes the content and how to install the required software and lesson packages and projects. The installation is a breeze with their interface and you're up and learning in less than a couple of minutes.
Package Breakdown
The package is MASSIVE and covers many areas of Flash, all of which are extremely useful tricks, not principals that you'll never have to use. Check out the breakdown of the DVDs, which includes some free downloads:
Disc 1
Part 1 – Graphics in Flash
Lesson 1: A Quick Flash Demo (48 min)
- Introducing the Flash Interface
- Adding Elements to the Stage
- Duplicating Library Items
- Introducing Keyframes, the Transform Tool & Tweening
- Creating Animations
- Adding Audio, Swapping Symbols & Testing a Movie
- Using Graphic Symbols
- Combining Animations into One Project
- Creating & Arranging Buttons
- Adding & Labeling Action Keyframes
- Adding Behaviors to Buttons
- Using the Publish Preview Command
Lesson 2: Meet Flash: Fundamentals (37 min)
- Navigating the Stage Area – Download (44.7 MB)
- Accessing & Organizing Panels – Download (67.4 MB)
- Saving, Exporting & Testing – Download (45.8 MB)
- Selecting a Flash Player Version for a New Project – Download (29.6 MB)
- Introducing Layers – Download (42.7 MB)
- Creating New Layers & Moving Items Between Layers – Download (38.6 MB)
- Customizing Keyboard Shortcuts & Locking Layers – Download (41.2 MB)
- Using Outline Mode, Layer Folders & Properties – Download (37.7 MB)
Lesson 3: Drawing with Vectors (28 min)
- Comparing Vectors & Bitmaps
- Working with the Pen Tool
- Drawing a Heart Shape with the Pen Tool
- Where to Put Points & How Far to Drag Handles
- Practicing Your Vector Drawing Skills
Lesson 4: Flash Natural Drawing Tools (45 min)
- Setting Up the Drawing Preferences
- Exploring the Pencil Tool Options
- Using the Line & Paint Bucket Tools
- Distinguishing Between Strokes & Fills
- Modifying Vectors Using the Selection Tool
- Snapping & Modifying Curves with the Selection Tool
- Altering Drawings with the Selection Options
- Using the Brush & Paint Bucket Tools to Fill
- Painting Using the Various Brush Modes
- Working with a Stylus & a Tablet
- Drawing with the Rectangle Tool
- Drawing with the Oval Tool
- Drawing with the PolyStar Tool
- Working with the Eye Dropper Tool
- Working with the Ink Bottle Tool
- Working with the Eraser Tool
Lesson 5: Advanced Vector Drawing (54 min)
- Intersecting Shapes within a Single Layer
- Using the Selection Tool
- Creating Complex Shapes with Intersecting Lines
- Combining Tools to Create Detailed Curves
- Vector Drawing Techniques
- Grouping Vector Shapes
- Editing the Contents of a Group
- Creating & Arranging Groups
- Object-Based Drawing
Lesson 6: Setting Colors in Flash (44 min)
- Introducing Advanced Color Selection – Download (40.9 MB)
- Working with the Color Mixer – Download (30.4 MB)
- Creating Transparency & Sampling Colors – Download (29.3 MB)
- Using the Color Swatches Palette – Download (43.3 MB)
- Applying & Stylizing Strokes
- Adjusting Cap, Join & Other Stroke Properties
- Applying & Transforming Gradients
- Saving & Locking Gradients
- Choosing a Gradient Overflow
- Adding Transparency to a Gradient
Lesson 7: Bitmaps in Flash (51 min)
- Importing Files to the Stage & Library
- File Compression Settings, Size Report & Use Count
- Compressing Individual Files
- Importing an Image with a Transparent Background
- Using Trace Bitmap to Change a Background to Vectors
- Changing a Foreground Item to Vectors
- Using the Optimize Curves Command
- Grouping an Image & Using the Transform Tools
- Performing Transformations Numerically
- Working with the Free Transform Options
- Working with Bitmap Fills inside a Vector Shape
- Using the Break Apart Command & the Magic Wand Tool
Lesson 8: Using Text in Flash (55 min)
- Auto-Sizing, Auto-Wrapping & Selecting Text
- Changing a Font, Picking a Color & Checking Spelling
- Using Rulers, Guides, Grids & Snapping
- Aligning, Distributing & Spacing Text
- Working with Device Fonts
- Editing Files with Missing Fonts
- Anti-Aliasing Text for Better Quality & Readability
- Paragraph & Character Formatting
- Using Text as a Design Element
- Text on a Path, Guide Layers & the Transform Panel
Lesson 9: Symbols (41 min)
- Introducing Symbols
- Creating & Reusing a Symbol
- Editing a Symbol in Place
- Editing a Symbol in the Library
- Modifying an Instance of a Symbol
- Nesting Elements inside a Symbol
- Adjusting the Color & Opacity of a Symbol
- Deconstructing & Reordering Symbol Parts
- Taking Advantage of Logically Ordered Layers
- Organizing the Library
- Looking at Symbols as a Movie inside of a Movie
Lesson 10: Symbol Effects: Filters & Blends (65 min)
- Applying Fader Gradients
- Adding Text & Graphics to a Background
- Converting Text to Symbols
- Using Drop Shadows with Text
- Using Drop Shadows with Symbols
- Applying the Blur Filter to Text & Symbols
- Customizing Glow & Bevel
- Disabling Filters & Using the Gradient Bevel Filter
- Stacking Order & Other Filters & Settings
- Saving & Using Filter Presets
- Understanding Blend Modes
- Using the Normal, Darken & Multiply Blend Modes
- Using the Lighten & Screen Blend Modes
- Using the Overlay & Hard Light Blend Modes
- Using the Add, Subtract, Difference & Invert Blends
- Building a Mask without Blend Modes
- Building a Mask Using Alpha, Blend & Layer Modes
Disc 2
Part 2 – Animation in Flash
Lesson 1: Introduction to the Timeline (55 min)
- Introducing Frame-Based Animation
- The Timeline Window
- Understanding Keyframes
- Animating Your Elements Using Keyframes
- Practicing Your Animation Techniques
- Using Onion Skin View
- Facial Animation
- Replacement Animation
- Rotoscoping
Lesson 2: Shape Tweening (70 min)
- Doing a Simple Shape Tween
- Getting Your Tween to Behave Properly
- Distributive & Angular Blending
- Working with Shape Hints
- Modifying a Graphic for a Better Tween
- Choosing Shape Hint Location for a Complex Graphic
- Segmenting a Graphic for Smoother Tweening
- Tweening Facial Expressions
- Using Shape Hints for Sophisticated Tweening
- Fine-Tuning Facial Animation
- Setting Up a Tween with Text
- Adjusting a Text Tween & Making it Loop
Lesson 3: Motion Tweening (64 min)
- Differences in Structure of Shape & Motion Tweens
- Converting an Object to Symbol & Motion Tweening
- Scaling & Rotating Motion Tweening
- Adding a Background Color & Making a Cloud Layer
- The Problems with Motion Tweening a Shape
- Problems with Using the Create Motion Tween Option
- Setting Up the Traveling Cloud Animation
- Simulating the Camera Flying Down to the Ground
- Animating the Airship Landing
- Creating an Elastic Landing Effect
- Replacing Grouped Ship with Ship & Canopy
- Animating the Alien Hopping out of the Ship
- Motion Tweening Individual Text Characters
- Adding Randomness to Text Animations
Lesson 4: Advanced Animation Techniques (59 min)
- Fading In a Background
- Animating a Banner with Filters & Text
- Animating a Title with a Blur Effect
- Animating Navigation Buttons into View
- Fading In a Block of Text
- Tweaking the Timing of Animations
- Setting Up a Motion Guide Path
- Orienting an Object to a Motion Guide Path
- Controlling Speed, Snapping & Registration Point
- Reconfiguring Your Workspace
- Adding & Swapping Facial Expression Symbols
- Modifying Elements to React with One Another
- Creating a Stretch & Squash Effect
- Tweening & Shifting Keyframes to Exaggerate Motion
Lesson 5: Simulating Speed in your Animations (62 min)
- Understanding Speed in Flash
- Introducing Ease
- Easing In & Out of Motion Tweens
- Improving Animations with Subtle Ease
- Using the Custom Ease In / Ease Out Dialog Box
- Easing within a Motion Guide Layer
- Customizing Ease for Position
- Customizing Ease for Rotation & Color
- Using a Gradient to Simulate Speed
- Applying a Motion Blur to Simulate Speed
Lesson 6: Nesting Symbols for Complex Animation (61 min)
- Introducing Timeline Effects
- Reviewing & Preparing for Animation
- Working with Groups & Symbols
- Symbols, Nesting & Motion Tweening
- Creating Nested Animations
- Building Multi-Layered Animations
- Creating Motion along a Path
- Packaging Symbols
- Understanding Graphic & Movie Clip Symbols
- Creating Character Animations
- Managing Character Animations with Nesting & Symbols
Lesson 7: Animated Masks & Filters (54 min)
- Using Open External Library to Copy Assets
- Animating a Mask Using a Shape Tween
- Creating a Magnifying Glass Effect
- Animating a Signature Using Stage Reveal
- Working with Complex, Layered Vector Artwork
- Reproducing an Adobe® Illustrator® Gradient
- Animating a Gradient to Create a Shimmer Effect
- Combining Filters, Blends & Motion Tweening
- Creating a Kaleidoscope Effect
- Creating a Realistic Drop Shadow
- Using Blend Options to Create a Soft Mask
Lesson 8: Sound & Video (85 min)
- Importing & Adding Sound to the Timeline
- Working with Audio File Sizes
- Adding Effects to Sound & Customizing Settings
- Syncing Up the Sound with the Action
- Working with Speech Compression
- Streaming Audio
- Working with Frame Labels
- Adjusting the Animation to the Voice Over Track
- Setting Up Audio for Lip Sync
- Adding a Looping Mouth Movie
- Fine-Tuning Specific Mouth Movements
- Changing Facial Expressions to Match Words
- Importing Video
- Editing Video Prior to Bringing it into the Timeline
- Selecting Video Compression Settings
- Adding Effects & Motion Tweens to Video
- Using Progressive Download & Selecting the Skin
- Using the Flash 8 Video Encoder
Disc 3
Part 3 – Making Interactive Movies with Flash
Lesson 1: Flash Buttons (54 min)
- Making a Simple Button
- Using a Hit State
- Making Animated Buttons
- Adding Sounds to Buttons
- Applying a Drop Shadow
- Making Buttons Using Bitmaps
- Using Blend Effects to Spice Up Your Buttons
- Adding a Message with the Status Bar Feature
- Using Buttons from the Common Libraries
- Using Rollovers to Display Images & Text
Lesson 2: Scripting Basics (51 min)
- Setting Up to Use Action Script – Download (34.9 MB)
- Introducing the Actions Window & Script Assist – Download (64.1 MB)
- Creating Buttons to Activate Action Script – Download (34.5 MB)
- Labeling Buttons in the Properties Window – Download (19.9 MB)
- Assigning Play & Stop Actions to Buttons – Download (44.2 MB)
- Organizing & Arranging Buttons – Download (19.3 MB)
- Using the Behaviors Window to Stop All Sounds
- Using the Goto and Play Behavior
- Modifying a Behavior & Adding an Action Layer
- Duplicating & Modifying Sequences in the Timeline
- Using Advanced Goto Behavior Options
- Linking a Button to a Website
Lesson 3: Basic Navigation Systems (64 min)
- Dividing Movies into Scenes
- Arranging & Adding Scenes in the Scene Panel
- Creating a New Scene from a Copy
- Adding Stop Action Scripts to Flash Scenes
- Setting Up a Basic Navigation System
- Using a Generic Action Script for More Flexible Navigation
- Creating a Non-Linear Navigation System
- Navigating with Keyframe Labels
- Navigating with Separate Flash Files
- Loading an External Movie inside of a Symbol
- Loading External Images inside of a Symbol
Lesson 4: Flash Screens (61 min)
- Setting Up a Slide Presentation
- Adding Content & Creating New Slides
- Nesting, Navigating, Arranging & Naming Slides
- Adding Filters & Text to Slides
- Adding & Resizing Navigation Buttons from the Library
- Assigning Behaviors to Screen Buttons
- Exploring & Editing Button Layers
- Using Transitions with Screens
- Screens vs. Forms
- Setting Form Parameters & Navigation
- Introducing Templates
- Using the Quiz Style Template
Lesson 5: Advanced Navigation Systems (69 min)
- Adding Slides & a Reference Guide Layer
- Rebuilding the Home Page & Adding Placeholders
- Setting Up a Movie Clip to Act Like a Button
- Adding Rollover States
- Using an Invisible Button
- Duplicating & Modifying Button Properties
- Adding Text & Navigation to Buttons
- Creating a Sub-Navigation System
- Looping, Adding Content & Using Scripts
- Nesting a Sub-Navigation System
- Setting Sub-Navigation System Links
- Pasting Frames, Swapping Content & Transitioning
Lesson 6: Data Entry Forms & Components (74 min)
- Creating Input Text Fields
- Creating Check Boxes
- Introducing Components & Dynamic Text
- Building a Form with Components
- Adjusting the Parameters of Components
- Adding Radio Buttons
- Setting Alignment & Adding a Text Area
- Adding Component Buttons & Themes
- Changing Component Themes Using the Library Panel
- Using Action Scripts to Send Information
- Setting Up Trace Actions
- Referencing Action Scripts
- Setting Up & Reviewing a Completed Action Script
- Using the Flash Exchange & Extension Manager
Lesson 7: Publishing your Movies (46 min)
- Looking at the Generate Size Report Option
- Exploring Test Movie Options
- Adding a Preloader
- Adding Animated Graphics to a Preloader
- Looking at the Publish Settings Options
- Viewing Published Files
- Exploring HTML Settings
- Centering an HTML Page Horizontally in Dreamweaver®
- Centering an HTML Page Vertically in Dreamweaver
- Copying the Correct Files to a Server
Lesson 8: Developing for Mobile & PDA (25 min)
- Exploring Publish & Device Settings
- Creating a Slideshow Document
- Setting Up Action Scripts
- Previewing with a Test Movie
- Animating a Movie Clip
- Creating a Navigation System with Action Scripts
- Tips & Resources for Developing Mobile Content
Interface
So once the CD install process is done, you're ready to launch the lessons, so pop in a DVD and away we go! I went through all the DVDs, so I started with Disc 1 and up popped John for a personal introduction and an explanation of what we're going to be learning. John is a great presenter with a good voice that keeps you interested rather than puts you to sleep. He's articulate and well spoken, so listening to him for hours on end isn't bothersome in the slightest.
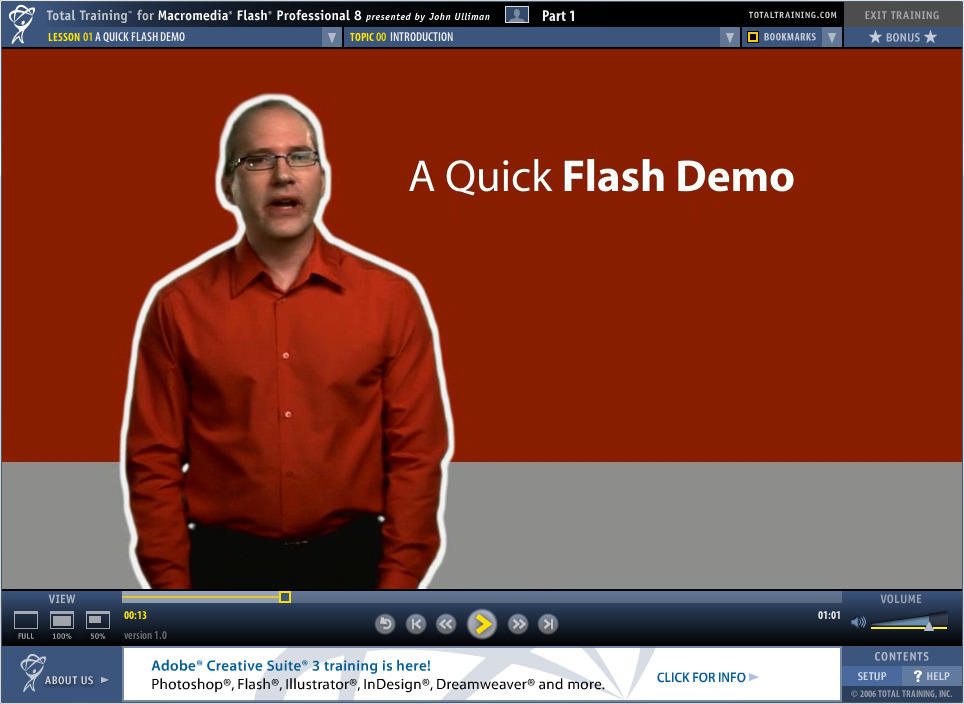
One of the biggest issues I have with video based tutorials is the absolute HORRENDOUS compression or the resolution of the video is so small that you can barely make out what the presenter is clicking on. Definitely a non-issue here, as you can clearly see everything on the Flash workspace and the overall interface for the video is fantastic. Here's a shot of a video lesson in progress:
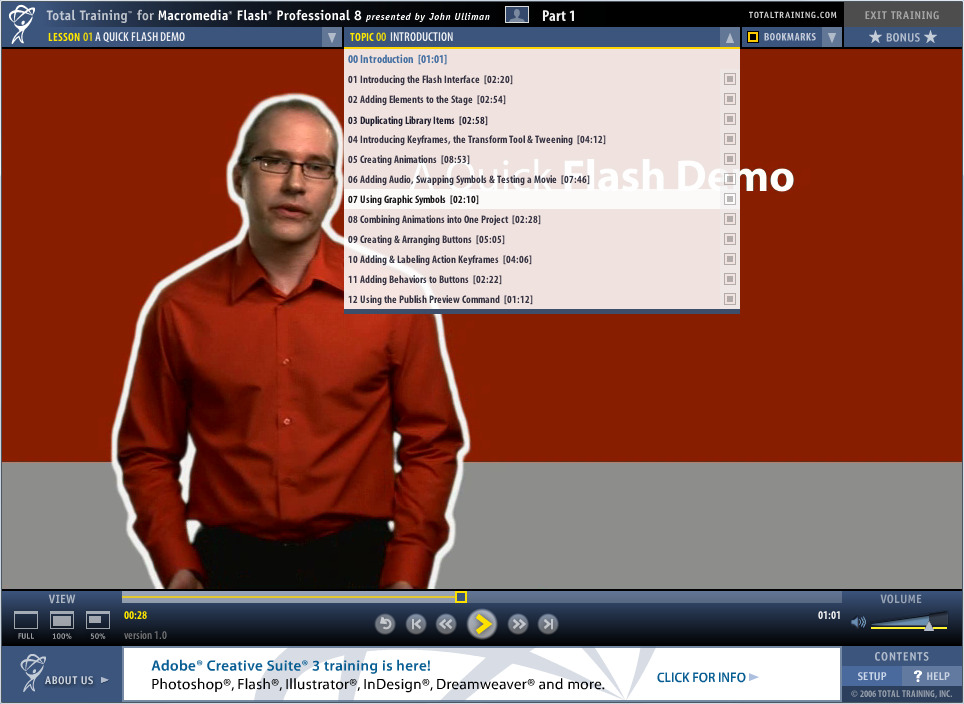
Here you can see how you can jump around within the Lesson areas on the fly… very easy drop-downs let you zip around between lessons and the sections of each lesson area. I love how you can jump around from anywhere in the lesson area rather than having to exit to a main menu.
Final Word
As someone that has been using Flash products for over 10 years, I can honestly say that these lessons are absolutely fantastic and I would recommend them to anyone looking to start learning to use Flash, or to a seasoned user looking to improve their animation skills. I personally REALLY enjoyed the Advanced Navigation Systems area on disc 3 (hey you know me… I'm a sucker for interface design) and the vector drawing and rotoscoping lessons were brilliant. Any of you "Scanner Darkly" fanatics should check that lesson out if you dug that movie's rotoscoping vector film effect.
The Total Training products are absolutely top notch learning tools, and I highly recommend them based on the hands-on use I've been able to experience with their product. If you're even mildly curious about Total Training lessons, you have GOT to check out their site at www.totaltraining.com and just browse through their free samples and you'll see this is nop-notch material. If you would like to pick up the Flash 8 series I just reviewed in this article, visit this page for more info!
A huge thanks to Total Training for sending me this awesome package and I look forward to sharing another review of some additional product I was able to pick out and we'll be looking at giving away some Total Training goodies in the very near future!
Thanks again and if you have any questions about this review, just drop me a note!
Dan
 or click on "Comments:" just under the title of the tutorial record.