How to Customize the Default Image and Link Paths in the WordPress Editor
Here’s a cool little trick Jamie figured out for me… I pretty much use the exact same path for all the images I post on this blog and I got tired of always typing out the path to the image folder along with the image name in the javascript popup you get when you click on the IMG button within the editor. I noticed that the pop-up always had http:// already filled in by default and I realized that I could probably change that to the image path I typically use to save some time. Being the coding idiot I am, I had no idea how to even start looking for this setting (although I did try for about an hour and found jack…) so I hounded Jamie about it and he found it in roughly 3.2 seconds.
Here’s how you do it…
Step 1: Open up your quicktags.js file located in the following subdirectory off your WP install dir: /wp-includes/js/
Step 2: Scroll down to the very bottom of the file and you will find the two functions that control the LINK button (edInsertLink) and the IMG button (edInsertImage)
The first function is the default URL you see when you click on the LINK button to insert a hyperlink. Change http:// on the following line to whatever path you want to come up by default:
function edInsertLink(myField, i, defaultValue) {

	if (!defaultValue) {

		defaultValue = 'http://';
The second function controls the IMG button… change http:// on the following line to whatever path you want to come up by default when you click on the IMG button:
function edInsertImage(myField) {

	var myValue = prompt(quicktagsL10n.enterImageURL, 'http://');
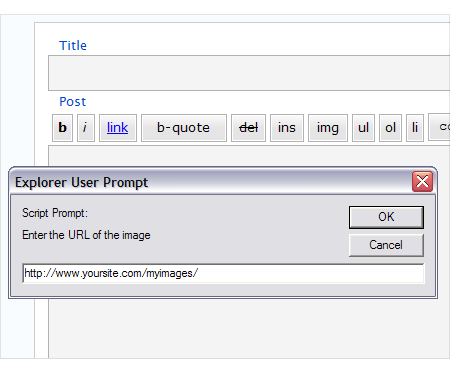
Step 3: Save and upload and you’re all set! Here’s a shot of it in action:
Enjoy and thanks again Jamie for this awesome little time saver!
Dan