Browsed by
Month: January 2008

How to Load and Install Corel Photopaint NIB Brush Packs

How to Load and Install Corel Photopaint NIB Brush Packs

A little while ago, I started offering a few brush packs for Corel Photopaint users on my blog (You can actually find those HERE) and I’ve been receiving quite a few inquiries on how exactly one goes about installing them.  Today’s little tutorial will run you through the easy process of installing the packs and explaining how they work.

WARNING: PLEASE NOTE!  Do not think of these as extra brushes you can pick… these are complete nib replacements for Photopaint, so when you use one of these packs, it will contain the default Photopaint brushes AND the extra brushes stated in the pack you download

The first thing I need to tell you is that the NIB management in Photopaint absolutely SUCKS and it’s full of bugs that have yet to be resolved.  in fact, if you Google around, you’ll find tons of posts from angry Photopaint users asking about various issues with loading, creating and deleting Nibs for pretty much any version of Corel Photopaint, including right up to X3, the latest release.  In fact, if you mess around with the Nib packs too much, you can completely corrupt the install and then you’re in for some real fun.  Here are some wonky things I noticed in the Nib management area:

  • There is a maximum number of Nibs you can add, and it’s very limited.  To make matters worse, if you hit that maximum, your Nib list starts going crazy. I don’t know what the max is… I hit it once and it killed my install and it was only after I found out there was a maximum.
  • Shouldn’t delete nibs, only add to the current ones in the pack you are using.  It’s hard to describe what happens to someone who hasn’t experiences the marvel of this absolutely infuriating bug.  Basically, let’s pretend you have 50 nibs in your pack and you delete the last two.  Let’s pretend the last 2 are some kind of circular brush.  Now, let’s say you add 2 new nibs to this pack… instead of showing the new nib in the list, it will show you the two circular nibs instead!  BUT, when you click on the nib, it will actually be your new nib shape.  Now, imagine the frustration of having a pack with 50 nibs that all have the wrong thumbnails attached.
  • You can’t start a new nib pack… you would think you can create a blank pack and start adding your own brushes, but you can’t.  I even found a blank nib pack on the net awhile ago, but when I tried adding nibs to it, I got the same issue as mentioned in the previous point.

I love Corel Photopaint, but the NIB interface is absolute crap and it’s the only huge bug I know of in Photopaint and it baffles my mind that this has not been fixed after several YEARS!  So, with that said, screwing around with Nibs SUCKS, so don’t do it unless you’re pretty good and navigating the unknown in the realm of software.  Lucky for you, I have these easy to download and install replacement packs!  You don’t have to worry about messing around with your packs, deleting and adding nibs etc… you simply download the pack and load it and you’re done.

Again, don’t think of this as extra brushes you are adding to Photopaint… it’s not.  These are complete Nib replacement packs that contain all the default Photopaint Nibs PLUS the extra Nibs stated in the pack.  So if you download the Blood Pack, each Nib pack includes the default Nibs, PLUS the Blood Nibs.  Make sense?

OK, so now let me show you how to install the packs, it’s easy.

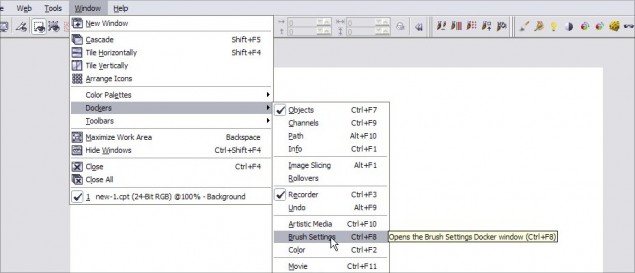
Step 1 – First thing you need to do is open Photopaint and either open up an image to edit or create a new file.  We’ll need to have something open to access the brush tools.  Once that’s open, we’ll need to open the Brush Settings Docker.  Click on Window > Dockers > Brush Settings and the Docker will open.

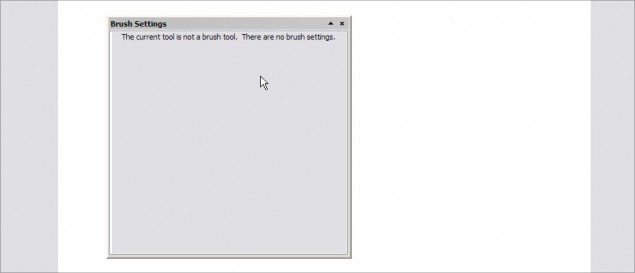
The Docker will open and probably be blank like this:

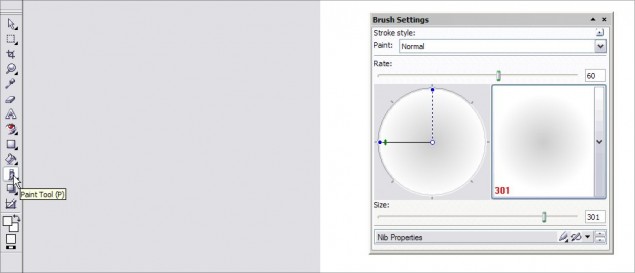
To activate the Docker so it shows the options, click on the Paint Tool icon, or just hit P:

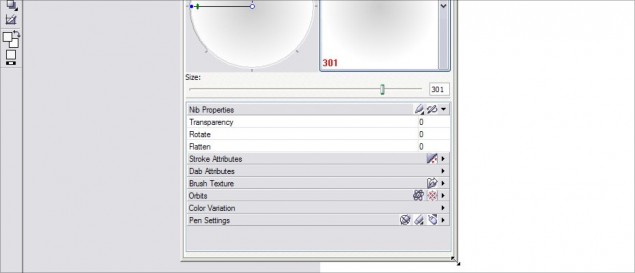
be sure to stretch the Docker open so you can see all the options:

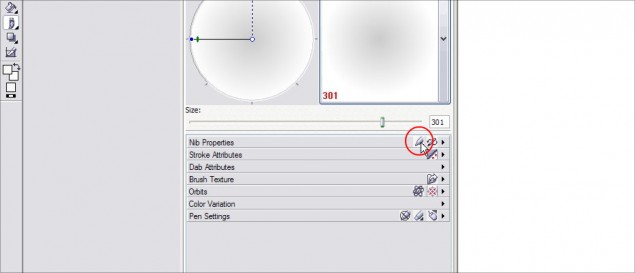
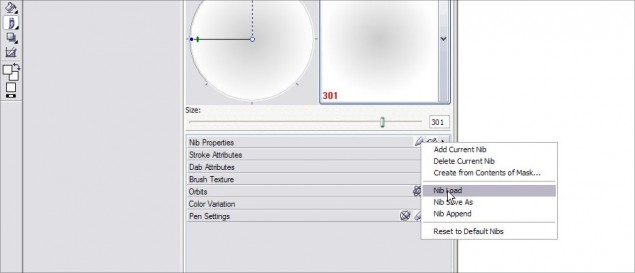
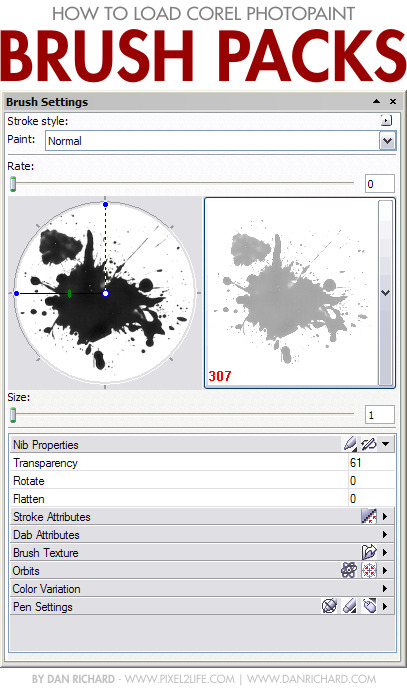
Step 2 – Time to load the Nib pack!  Click on the Nib Options button (circled in red below) and then click on Nib Load to open a file browser window:

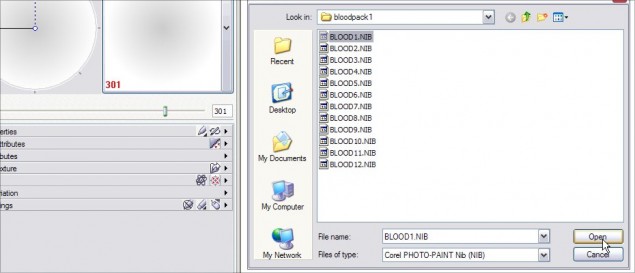
Now, just browse to the Nib pack you downloaded and extracted and click on the one you want:

All done!

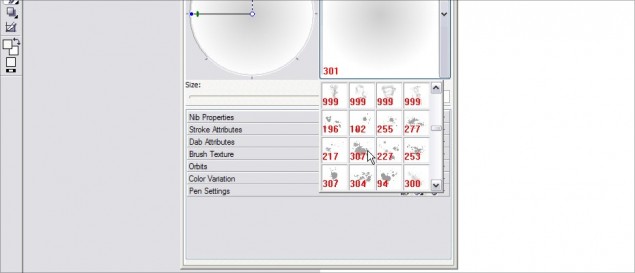
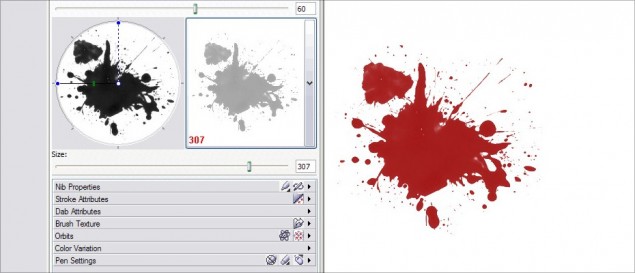
Step 3 – You can now select the nib shape and get to work!  Just use the Nib Browser to scroll through the thumbnails and you’ll see that you now have the same default Nibs, plus the custom ones towards the bottom:

Click the one you want and you’re good to go!

Pro Tip: Remember, you can use these brushes with any of the Paint tools, eraser, clone tools etc… any tool that lets you use a Nib will let you use these custom packs.

That’s it gang, easy as pie… Thanks again for reading my tutorial and please be sure to comment below or share this with your friends!

Thanks,
Dan
The IE Ctrl-Q Thumbnail View Trick

The IE Ctrl-Q Thumbnail View Trick

Hey guys… I just accidentally found a nifty little trick when using IE 7 that I didn’t know about. There is a keyboard shortcut that quickly allows you to see a thumbnail view of all tabs you have open in your browser, and from there you can click on one you want or close down the ones you don’t need. If you have a ton of tabs open like I do, this is WAY easier than fumbling around with the little tabs at the top.

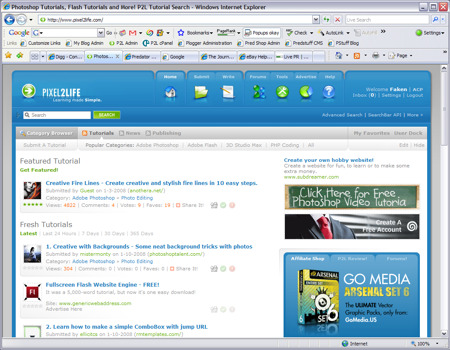
So, here is the browser open with several tabs on the go:

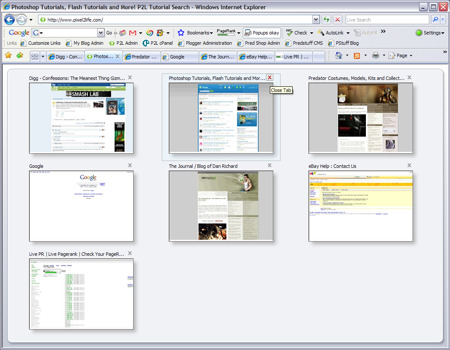
And this is how it looks when you hit Ctrl-Q:

It’s an addicting little trick… kind of like using Windows Key – E to open Windows Explorer instead of doing a right click on the start button or even worse, doing the All Programs > Explore bit…

I also checked FF, Safari and Opera for this little bit of trickery, but it appears only IE has this particular feature. So next time you get in a penii measuring contest over FF vs IE or whatever, remember, you’ve got the Ctrl-Q trick up your sleeve!

Dan

Fun with Backdrops – Something to try with your camera!

Fun with Backdrops – Something to try with your camera!

Hi all!

Phew, I have been MAD busy with P2L and the Predatorstuff.com website (AvP-R was recently released in theaters so everyone has Predators and Aliens on the brain), but I hope everyone had a great Christmas and I wish you and your families all the very best in the new year. I would especially like to thank the P2L crew for all of their very hard work in the past year and I look forward to working with you guys in 2008! We’ve got a lot in the planning so it should be quite the summer.

Anyhow, I wanted to share with you guys a fun little experiment I did this morning for a photo review… I wanted to try something with small detailed backdrops on one of my kits and I think it came out pretty sweet so I thought I’d share this with you photography buffs to try it out. Here’s how it turned out:

You can check out the rest of the pics from this experiment in the Predatorstuff Gallery.

It was a fairly simple trick, but I love how dramatic it looks… first thing you need to do is find your backdrop images. I went on DeviantArt and did a search for “1920×1200″ and it showed me a list of TONS of high resolution wallpapers and artwork. I picked out a few that I liked and printed them with my inkjet on some Cannon Matte Photo Paper (It’s important to use a matte finish, not glossy or high gloss or you’ll get shines and reflections from your lights) with my borderless printer. I let them sit for about 30 minutes to ensure they dried completely and I started to set up by photography table, light tent and lights. I then placed a light at the back of the tent and pointed it forward towards the camera. I used a clamp to position the printed backdrop upright directly in front of the light fixture and you immediately get this cool backdrop effect where the darks stay black and the lighter areas of the print out are glowing brightly with clean diffused light. Then I just place my kit in front of the backlit backdrop and it’s photo time!

The only limitation is that by printing on a 8.5″ x 11” you only have a tiny backdrop, so I couldn’t get complete kit shots, but I managed to pull off some very nice close-ups. The end result was the Predalien standing in front of a fire or explosion in a very natural looking photo without any post editing in Photoshop. Why mess with photo editors if you can do it straight with the camera?

Anyhow, that was my little experiment today and I thought it came out pretty cool… I’ll need to order some large prints from DeviantArt so I can have larger backdrops and use them to photograph larger pieces. Give it a try to spice up your photos, it’s a fun way to spruce up your product and macro shots.

Dan

Happy 4th Birthday Pixel2Life

Happy 4th Birthday Pixel2Life

Happy 4th Birthday Pixel2Life

Pixel2life.com was officially launched at 8PM January 2nd, 2004 and here we are a few hours away (posted early for those in diff time zones) from celebrating 4 fantastic years.

Happy 4th Birthday Pixel2life, to all our Staff, our members, tutorial contributors, supporters and advertisers not forgetting our spammers whom have all made this site an official success.

Special thanks to all the past Staff who spent many many hours coding/moderating and helping this site grow to what it is today on behalf of Pixel2Life thankyou all.

Thankyou Dan (Faken) for giving us the greatest tutorial site on the planet and thankyou for the 4years. <img src=”style_emoticons//flowers.gif” style=”vertical-align:middle” emoid=”:flowers:” border=”0″ alt=”flowers.gif” />