It’s a fairly unknown fact that I really enjoy restoring old destroyed photos to digital beauty ever since i was handed some old photos of my grandparents that my mother had kept, despite being somewhat damaged by water. The end result of that project was pretty good, but over the years I’ve been fortunate to learn some fairly advanced tricks and techniques, and when I get time, I pull out an old photo and play around. I think of it as a photo CSI… working out how things were destroyed and how to best fix it up. The more destroyed a photo is, the more I enjoy it and I try to “fudge” as little as possible whenever I can. I probably completely restore about a dozen severe photos a year and my first of the year was a real doozie and I thought I’d share it with my friends that read this journal blog.
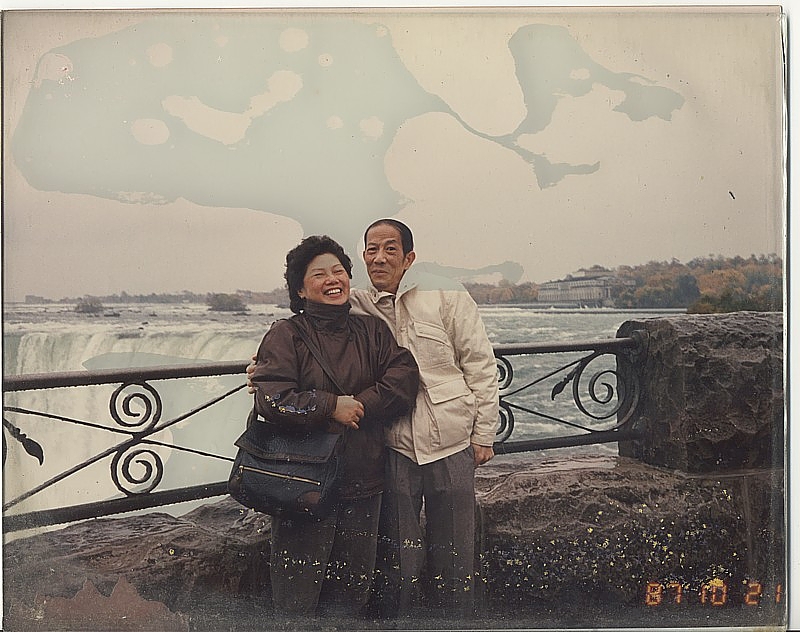
Here’s the situation… I was given a photo by my very good friend Chris, and it it was a pic of his parents together in Niagara falls during the 80s. The photo obviously meant a lot to him, but it was in very rough shape. Here’s a look at the before photo (click for a larger view):
Here’s a list of issues with this photo so you know what I was dealing with:
1. First off, the photo was actually STUCK to the glass that was in the frame, so I couldn’t even get the glass off to scan it in, so the scan was done as is. I wold have to clean up the light refraction issues as I restored the photo.
2. The huge blue blob areas are where the photo is stuck to the frame. There is no way to remove that photo from the glass without destroying the photo, so all the blue blobs would have to be digitally repaired.
3. The entire bottom left corner is torn right off with only the backing of the paper showing.
4. Moisture spots cover the entire base of the photo… you can see these purple and yellow marks in the darker areas such as the rock base of the fence, their pants, and her mother’s coat and purse.
5. There is a thick film of cloudy grime along the left and right edges of the photo, and a very thick band of it all along the bottom of the photo. That dirst is on the photo itself, not the glass so I can’t just wash it off. Any detailing on the bottom of the rocks is totally gone.
6. The “glued” part covering the section of waterfall to the right of the mother has complete swallowed up the detailing of the falls.
7. The sky is covered in dust and dirt particles. You can see some of the larger pieces of dirt in the sample photo above.
8. The paper is badly discolored due to age and light exposure.
9. There are two ripples in the sky caused by the photo being rippled and warped. I can’t flatten it because it’s glued in place on the glass.
So that’s the major issues… now, bear in mind the sample above is roughly 800 x 600 pixels, which may not seem to large or time confusing. Nice try, but this is just a down sample for you guys to quickly look at. The real digital copy that I modified was in fact an 8″ x 10″ photo at 300 DPI, so that’s actually about 2400 x 3000 pixels to repair. It was going to take a lot more than the clone tool!
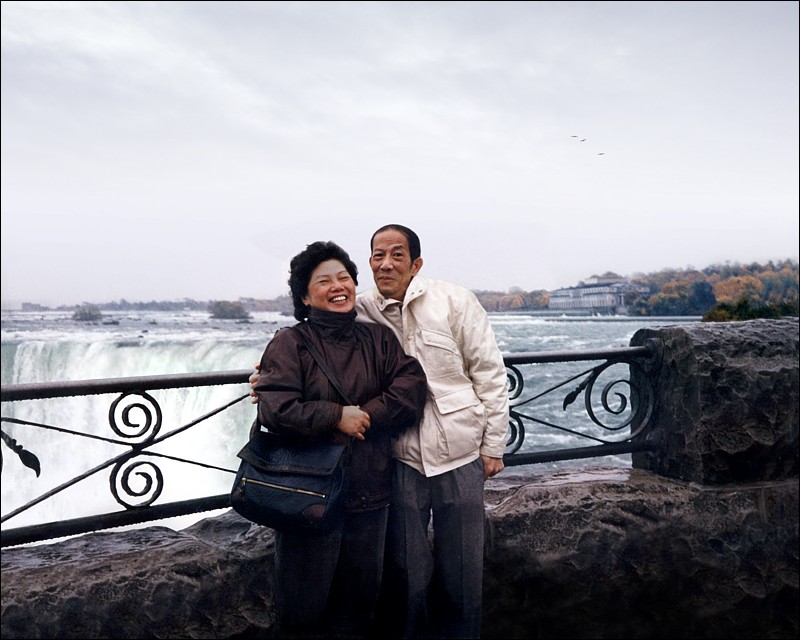
So, 10 working hours later, here is the fixed result of my efforts (click for larger sample):
The look on his face when I handed him the final printed photo made every minute of this project 100% worth it. He’s actually going to Hong Kong in a week so he’ll be bringing a copy for his brother who still lives there. I ended up making 3 versions for him… one with the date restored like in the original, one without the date, and one without the birds I added for the heck of it.
Anyhow, that was my fun project last week, hope you like it!
Dan