Converting a color photo to a scratchy black and white or sepia in Corel Photopaint!

Converting a color photo to a scratchy black and white or sepia in Corel Photopaint!

Why hello there boys and girls, I hope everyone has been behaving themselves seeing as it’s been MONTHS since I’ve been able to sit down and throw together a tutorial for you. I apologize for the huge absence, but as most of you probably know, I have been going through some fairly massive life-changes so things have been a wee bit hectic. BUT I am happy to say that things are calming down and my work routine should be coming back to normal. With that said, here’s a small tutorial I wrote today based on a request from one of my Facebook friends asking about a photo I posted from my recent trip to Cuba.

If you’ve never been to Cuba or seen photos from other friends and whatnot, Cuba is basically frozen in time with LOADS of items such as cars, furniture, tools and much more from the 40s, 50s and 60s. In fact, you will see perhaps 4 cars from the 1950s for each car you see manufactured in the last 10 years or so… needless to say, this is heaven for a classic car lover like me! While walking around one of the markets, my girlfriend snapped a shot of me standing next to a 1955 Chevy and we both noticed that this pic could easily be an original black and white from the 50s. So, I promised her I would make it look like an old photo for our album and I posted it on FB for my friends to check out. Here’s how I did it in about 5 minutes.

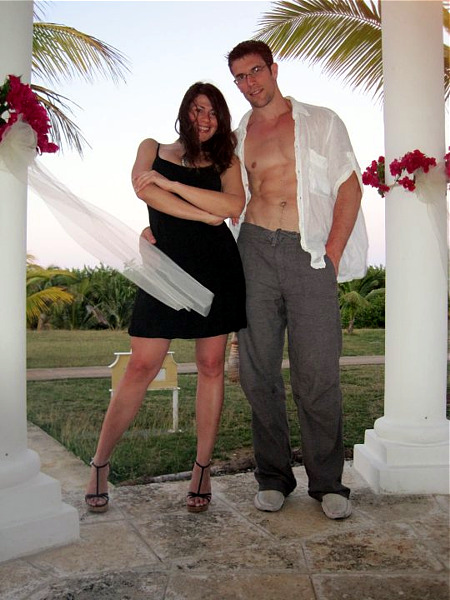
Here’s the original photo we’re going to start with:

And here’s what we’re going to end up with at the end of the tutorial:


Before we get too far in to it, I’m going to assume you are now familiar working in Corel Photopaint. If you’re not sure how to use Objects and other basic functions, please check out my older tutorials, which cover the basics in greater detail.

Step 1 – First thing we need to do is create a duplicate layer of the photo… so just do a simple copy/paste and duplicate the layer.

Step 2 – Click on the new object layer and desaturate the layer… you do this by clicking on Adjust > Desaturate. Your photo will now appear in greyscale.

Step 3 – After running the desaturate function, the photo will be stripped of the depth the color gives it, making the photo appear a bit bland and lacking highlights and shadows. We’re going to punch this up a bit by playing with the contrast. In my older tutorials, I used to use the contrast/brightness/intensity function, but I have lately been using the more powerful Image Adjustment Lab, which you can access by clicking on Adjust > Image Adjustment Lab.


Step 4 – The Image Adjustment Lab allows you to controla variety of adjustments you can perform on the photo, including the saturation, overall brightness and contrast, as well as boost highlights, shadows and midtones. First thing I like to do is pump up the contrast, then I adjust the highlights and midtones to a level that appeals to me. You can see the adjustments I made below:


Once you’re happy with the look of your photo, click OK to apply the changes and return to the main edito screen.

Step 5 – Before we merge the object layer with the background layer, there’s one more little trick I like to do, and that’s add just a pinch of color to the photo… you want just a little smidge though, something barely noticeable. You do this easily by simply reducing the opacity by a fraction on the main object layer. I dial it down to 92% for the level I like:


At this point, we no longer need to keep the layers seperate, so go ahead and merge them and we’ll move on to the next step.

Step 6 – Time to mess up our photo and give it some age. I quickly did an image search for scratched photo textures and found this beauty by Jeremy Brotherton on his Deviant Art page (click here).  Just paste this right on top of the photo.

Step 7 – After you’ve slapped a texture on top of your photo, set the object layer type to “multiply” and you’ll start to see the magic happening! Of course we’ll need to adjust the texture a bit, so let’s tweak it to where we want it to be…

I want to pump up the highlights of the texture so it doesn’t darken the photo up too much. We can do this easily by pumping the contrast up to the max:

The texture will still be a little too intense, so I tone that down by reducing the opacity to 40% or so. The texture looks good, but it’s not quite scratchy enough for me, so we’ll build that effect up a bit more.

Step 8 – I want more scratches in the photo, so paste another layer of the texture and set that layer to “If Darker” and reduce opacity to 30ish% and the scratches should now look pretty convincing and realistic.

Step 9 – One more step… the photo looks great, but it’s a little too clear for an old photo. We can dirty up slightly by adding a tiny bit of noise. Hit the noise filter by clicking on Effects > Noise > Add Noise.

And we’re done! Here’s our final result straight out of the 50s and ready for your album:

Would you prefer Sepia? Adding a Sepia effect to this end result is one step away, and VERY easy. Just click on Adjust > Color Balance and tweak the yellow and magenta sliders like so:

You can also drop the photo in to a Polaroid template (There are dozens of these available on Deviant Art):

Thanks for reading, please make sure to share this tutorial or comment using the tools below!
Dan

Final Update and Thoughts on “error 24” Issue with CorelDraw!

Final Update and Thoughts on “error 24” Issue with CorelDraw!

Good morning everyone!  Wow, this whole "error 24" issue out of Corel that I figured was a small error I had somehow generated through some magical Vista voodoo ended up being quite the event, not to mention my most commented article to date on this blog.  I want to thank everyone that stopped by to post a comment, be it to thank me for the help or to slap my wrist for helping folks with pirated copies circumvent the error.  All comments are welcome on here as long as they are civil, so no worries.  Anyhow, Corel has posted their final statement on the issue and have offered a deal for anyone that has been scammed by a retailer as long as you have proof of purchase, or if you want to purchase X4 outright.  Please check it out HERE.

At this point, it's obvious that Corel is acknowledging the fact that many users have paid for software thinking it was legitimate when in fact it was not, or people were using valid NFR or demo versions, or you were using a pirated version with a generated serial number.  The application is programmed to expire on these non-retail type passwords June 1st, 2010, hence the shenanigans that kicked up this week. I personally have been using NFR copies given to me directly by Corel since version 12, and quite honestly, this is the first I hear of any kind of expiry on them.  I called Corel this morning and they confirmed that my X4 was a vendor eval version and unfortunately has expired and I can no longer use it.

This is frustrating to me because when I was given this copy, I was not told of any expiry date or time limit, nor did it mention any in the terms and conditions I agreed to when installing the software.  Granted, I was given this software for free, but I don't think it's a far cry to say that I have since sold many copies to potential clients through my constant plugging of this software, not to mention the thousands of views my Corel tutorials and articles have received.  Either way, my X4 has expired so the question becomes, what do I do now?

First up, I've removed my X4 install and re-installed by eval copy of version 12… and low and behold,it works fine with no error.  So it would appear that the expiry date on vendor eval copies is new in X4 (unless X3 had the same expiry date).  Next up, I'll see if I can get a copy of X5 in the same manner, otherwise I'll pick it up… upgrade is $200 from the Corel store, so not a huge deal when compared to Adobe's pricing, although Photoshop has clearly become a heck of a lot more powerful vs Photo Paint, and there's no touching Illustrator.  But I guess when you've been using the same software brand for 15+ years, you get a little attached to it.

OK, moving right along… in terms of folks linking to the dr14.dta file in my previous post about this topic, I'm afraid that because this is a confirmed issue with eval versions expiring or generated serial numbers being invalid, using this workaround is not legal.  I know many of you have paid good money for your Corel software, but you've been unfortunately scammed and need to contact Corel ASAP to get your issue resolved.  So that being said, and after speaking with the Corel rep directly to confirm all the facts, I will be removing all the links to the .dta files in the comments area.  I know anyone can find these doing a simple Google search, but it's not exactly in my nature to support software piracy seeing as it's almost a daily struggle for me to stop people from copying my sites, stealing content etc.

So thats it from me on this issue…  now to get back to writing tutorials!  By the way, in case you are new to this blog and found out about it when you searched for a resolution to the "error 24" thing, thanks for stopping by!  If you're fairly new to the world of CorelDraw and would like to check out some Photo Paint tutorials, check out my complete list HERE!  I also run a huge tutorial search portal with thousands of free tutorials for graphic designers, programmers and webmasters and you can check that out at Pixel2life.com.

Thanks again for all the comments and feedback guys, take care and happy drawing!

Dan

Product Installation Unsuccessful Please Reinstall Error 24 – Corel Photo Paint, CorelDraw etc dead June 1st 2010!

Product Installation Unsuccessful Please Reinstall Error 24 – Corel Photo Paint, CorelDraw etc dead June 1st 2010!

Nothing like settling down to get some work done in Corel and the stupid thing won't start suddenly and you're greeted with this charming error message:

Product Installation Unsuccessful Please Reinstall Error 24


This is a problem we are all experiencing with the date change to June 1st, 2010 and pretty much everyone seems to be experiencing it and Corel is working on a solution as of right now.  The only solution for now is to set your PC clock to February (don't change the date or year), run the program to start it up, then change your date back.  There is a huge thread on this issue on the Corel forums and they have confirmed this is a program issue and they are working on a patch right now.  Gerard Metrailler says to keep an eye on the blogs for the patch when it's released ASAP.

I'll post an update as soon as the patch is released.

Take care!
Dan

UPDATE! Looks like if you have a demo version (which is what I have direct from Corel) or a naughty pirated version, you're SOL.  The issue doesn't seem to exist "apparently" for folks that have the regular retail edition.  You can read the official post HERE.  Looks like I'll be calling Corel tomorrow!

UPDATE 2! There is a patched dr14.dta floating around on the net that fixes the issue by replacing the old one on your system, however all known download links are no longer functional.  Please contact me if you have it (select contact the webmaster from the dropdown on the contact page)!

UPDATE 3 – Another solution!

Hey guys… ok here's a little something I just found that allows you to run an application under any date and time you specify but WITHOUT changing your actual system date.  It's called RunAsDate and it's free… unfortunately it will only run on 32 bit Windows versions so I can't use it myself as I am on 64bit Vista, but looks like a neat little app that won't mess with your system's actual date.  Check it out and download it at http://www.nirsoft.net/utils/run_as_date.html

UPDATE 4 – FINAL FIX!

Thanks to everyone that has posted comments and links to the patch!  You can find it here: *link removed*

Simply overwrite the old one in C:\Documents and Settings\All Users\Application Data\Corel\CorelDRAW Graphics Suite X4 or wherever your "All Users" is located.  In vista and Windows 7 it will be in C:\Users\All Users\Corel\CorelDRAW Graphics Suite X4

NOTE – If you do not see the "All Users" folder, it's because it's a hidden folder and you have your Windows Explorer set to hide hidden files and folders.  You can change that setting by going to Tools > Folder Options > View and then click on Show hidden files and folders.  Hit OK and you're good to go!

UPDATE 5 – For those of you using this fix and you have a legit version of Corel, you should still contact Corel directly to report the issue.  I just called them and they confirmed issues with buyers that purchased from legitimate big box locations, so this is a serious problem.  So please contact Corel directly if you have bought a real copy and you are having this issue, it's important.  For anyone that has a stolen/warez copy, come on guys…  help support the programmers that made this product and pony up for a legit version or haggle Corel for a NFR copy!

UPDATE 6 – Guys, just finished speaking with Corel about what's happening with my eval copy and the issue in general.  Please read my new post by clicking HERE. Please don't post links to the dta file in the comments as it's no longer needed… Corel will help anyone that is having the "error 24" issue and has proof of purchase for the software.  Just call them up and they will help you.

Life Update… what’s new in Dan’s World.

Life Update… what’s new in Dan’s World.

Hey all!  Wow can't believe I haven't updated this blog since February, that's pretty sad on my part!  I have been active here and there, but mostly I have been involved in renovations and off-site related activities that have me completely removed from the front of a computer and my inbox.  Now I know most of you know that at the beginning of the year I was separating from my wife, looking for a new house and trying to figure out what to do with P2L, my professional life and everything else in between.  Well, I am happy to report that things have been going VERY well and I am happier now than ever.

In terms of the housing situation, I was able to sell off a vast amount of my collection and pay off all my dept and get a downpayment for a new house, which I bought and moved in to February 12th or so.  The house is located in Montreal near Corina's school and it's quite a bit of a fixer-upper.  I couldn't hope to afford a decent sized place that was in fantastic condition, so I was looking for something with a great floorplan and could be renovated like I wanted over the next year or two.  The place I found was exactly that, but good Lord there's a TON of work to be done.  I posted a bit on the teardown of the nasty coldroom back in March on the P2L forums, you can read that by clicking HERE!

Later in that same month I took on a condo renovation project that lasted about a month… this was a near complete rebuild of a 2 bedroom condo, I actually stripped the bathroom right down to the wall studs!  This was actually a great opportunity for me to learn a few things that ill be later applied to my house, so it was a fun project.  My girlfriend Maibbeth would come by to check up on me, bring me lunch and/or cheer me on.  One time I got busted working.. well… not very hard:

A couple of weeks ago it started getting pretty crazy and I was burning out… it was definitely time for a vacation so I could get my head back in the game and unwind a bit.  I had been going several months nonstop on a rollercoaster ride so a break with my baby was definitely in order.  I will say this right now… Maibbeth is the only reason I didn't lose my mind with all this.  She has been the most amazing, supportive and loving person I could have ever hoped for, and I will never forget everything she's helped be through.  Love you baby!  So, we booked a last minute vacay down south… to Varadero, Cuba!

I've been back for a couple of weeks now and been struggling to catch up and get back at it… still finishing a few details at the condo project, then I will be back at it at my place fixing up the coldroom and then attacking the bathroom upstairs, but I will be back online as well balancing my online life and work with personal stuff.  I just wanted to let you guys know that I am in very good shape mentally and physically and things are going well beyond my expectations.  I want to thank everyone again for their amazing support at the beginning of the year and thanks to all of you that continue to show your friendship.  You've all been AMAZING and I owe you all so much.  So here's to you *raises glass* and I look forward to bringing you more content, reviews and laughs in the near future!

My sincerest thanks and best wishes,
Dan

Dare Foods Ltd Social Tea Cookies… Now comes in Wasp Body Parts Flavor!

Dare Foods Ltd Social Tea Cookies… Now comes in Wasp Body Parts Flavor!

Why hello everyone!  As I prepare to move and I tidy up my office, I was reminded of something rather nasty that occurred a couple of months ago…  while happily munching away on a box of Social Tea cookies from Dare Foods Ltd (huge brand in Canada) I found this…

Yes, that is indeed a wasp's head…. embedded in a cookie.  MY cookie, that I was about to eat.  Needless to say, I will never eat one of these cookies ever again, nor will I ever buy anything with the Dare logo on the box.  Check out the video:

http://www.youtube.com/watch?v=-aTSqwmpPVE&fmt=22

I should probably warn you NOT to watch that unless you don't mind inspecting every cookie you eat for the rest of you life lol!

Dan