Browsed by
Category: Articles and Resources

Product Installation Unsuccessful Please Reinstall Error 24 – Corel Photo Paint, CorelDraw etc dead June 1st 2010!

Product Installation Unsuccessful Please Reinstall Error 24 – Corel Photo Paint, CorelDraw etc dead June 1st 2010!

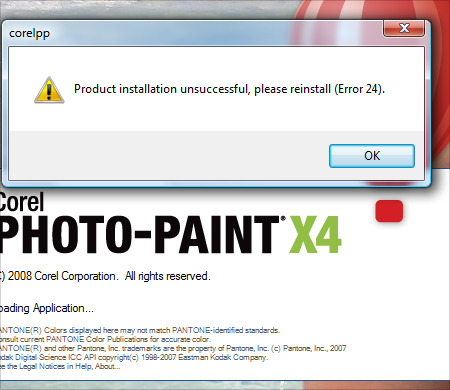
Nothing like settling down to get some work done in Corel and the stupid thing won't start suddenly and you're greeted with this charming error message:

Product Installation Unsuccessful Please Reinstall Error 24


This is a problem we are all experiencing with the date change to June 1st, 2010 and pretty much everyone seems to be experiencing it and Corel is working on a solution as of right now.  The only solution for now is to set your PC clock to February (don't change the date or year), run the program to start it up, then change your date back.  There is a huge thread on this issue on the Corel forums and they have confirmed this is a program issue and they are working on a patch right now.  Gerard Metrailler says to keep an eye on the blogs for the patch when it's released ASAP.

I'll post an update as soon as the patch is released.

Take care!
Dan

UPDATE! Looks like if you have a demo version (which is what I have direct from Corel) or a naughty pirated version, you're SOL.  The issue doesn't seem to exist "apparently" for folks that have the regular retail edition.  You can read the official post HERE.  Looks like I'll be calling Corel tomorrow!

UPDATE 2! There is a patched dr14.dta floating around on the net that fixes the issue by replacing the old one on your system, however all known download links are no longer functional.  Please contact me if you have it (select contact the webmaster from the dropdown on the contact page)!

UPDATE 3 – Another solution!

Hey guys… ok here's a little something I just found that allows you to run an application under any date and time you specify but WITHOUT changing your actual system date.  It's called RunAsDate and it's free… unfortunately it will only run on 32 bit Windows versions so I can't use it myself as I am on 64bit Vista, but looks like a neat little app that won't mess with your system's actual date.  Check it out and download it at http://www.nirsoft.net/utils/run_as_date.html

UPDATE 4 – FINAL FIX!

Thanks to everyone that has posted comments and links to the patch!  You can find it here: *link removed*

Simply overwrite the old one in C:\Documents and Settings\All Users\Application Data\Corel\CorelDRAW Graphics Suite X4 or wherever your "All Users" is located.  In vista and Windows 7 it will be in C:\Users\All Users\Corel\CorelDRAW Graphics Suite X4

NOTE – If you do not see the "All Users" folder, it's because it's a hidden folder and you have your Windows Explorer set to hide hidden files and folders.  You can change that setting by going to Tools > Folder Options > View and then click on Show hidden files and folders.  Hit OK and you're good to go!

UPDATE 5 – For those of you using this fix and you have a legit version of Corel, you should still contact Corel directly to report the issue.  I just called them and they confirmed issues with buyers that purchased from legitimate big box locations, so this is a serious problem.  So please contact Corel directly if you have bought a real copy and you are having this issue, it's important.  For anyone that has a stolen/warez copy, come on guys…  help support the programmers that made this product and pony up for a legit version or haggle Corel for a NFR copy!

UPDATE 6 – Guys, just finished speaking with Corel about what's happening with my eval copy and the issue in general.  Please read my new post by clicking HERE. Please don't post links to the dta file in the comments as it's no longer needed… Corel will help anyone that is having the "error 24" issue and has proof of purchase for the software.  Just call them up and they will help you.

Bypass the Annoying Virus Scanner Warning for MSN Transfers!

Bypass the Annoying Virus Scanner Warning for MSN Transfers!

Hey all!  Because of all the work Nick and I do over MSN, we were constantly getting nagged by MSN any time we would try to transfer anything beyond a .jpg file so he whipped up a quick and handy little bypass utility.  It’s a simple .exe file made in C++ that simply returns 0 and exits without anything actually running.

You can download the file by clicking HERE.

Full installation instructions:

1) Download the app: click HERE

2) Extract the .exe to a location of your choice (My Documents).

3) Set the anti-virus in Windows Live Messenger:

– Go to Tools > Options > File Transfer
– Check the Scan files for viruses using option
– Click Browse… and select the DoNothing.exe application you extracted.

Enjoy!
Dan

Making Sense of the DPI Equation – A Follow-Up

Making Sense of the DPI Equation – A Follow-Up

Hey all! One of my most popular articles/tutorials is a rather large write-up on the difference between DPI and screen resolution because it seems like almost everyone is a a little confused on what the two mean and how they affect each other (or rather how they DON’T). The tutorial was called “Learn how to use the right DPI for Printing or On-Screen Graphics – Making Sense of the DPI Equation” and you can check it out by clicking HERE.

A TON of you have posted comments and questions and added more information on this article and I thank you all for your contributions! Recently I received an email from a fellow designer named Steven and he was a little confused about the tutorial and had a question regarding how to apply this article to his current project of printing our business cards. I thought it was a great question and one that I have received many times in one form or another, so I thought I would share it on here for anyone else that was having a similar issue. Here is the original email I received:

I loved your tutorial at 13dots.com about dpi and printing. Truthfully, you seem far more patient and methodical that many others on the net, many thanks.


*Dan blushes furiously*

I followed the links to Danrichard.com. There was one important piece of info that I felt was missing, and that’s why I’m writing.

What program works well for downsizing for print? My photos are at 2048×1536 at 72dpi. Because of you, I understand that the dpi is essential here. I want to print these in business card sizes, without losing detail. So I’m thinking 300 dpi (likely the max of the colour commercial laser printer I’ll be using) is my goal. 300x2in (height) is 600dots vertical by 900 dots horizontal…(hmm that doesn’t seem to help me, please disregard). What program (open source would be best, like gimp) will reduce to 3″x2″ at 300 dpi? I’ve spent the last 8 hours trying to do this, using gimp, browsing so many tutuorials, etc. My images look so blocky and lose so much detail.

Many sites said to use photoshop (Image> Image Size menu. Click on Resample Image and choose Bicubic Sharper from the drop-down menu). Is that the only way? I’m so trying to stay open source.


Legit question right? Here’s my windy answer…

The first thing you need to let go of is the screen resolution vs DPI, it’s meaningless. So if your native digital image is 2048 x 1536, then that is it’s screen size no matter what the DPI is… DPI is for printing, it has no bearing on screen size. So if an image is 2048 x 1536, then it will be that size no matter what the DPI happens to be when measuring it for printing in inches or CMs for example. So, now, what you want to do is calculate how big your native digital images needs to be in pixels to achieve a 3 x 2 inch image at 300 DPI.

By the way, first let’s see how big this image is at 72 DPI in inches, the math is very easy:

2048 pixels / 72 DPI = 28.44 inches wide
1356 pixels / 72 DPI = 18.83 inches tall

If you do the same thing with 300 DPI, then the image would print out to this size:

2048 pixels / 300 DPI = 6.83 inches wide
1356 pixels / 300 DPI = 4.52 inches tall

So, this means that if you were to print out this image in its native resolution, you would end up with an image 28.44″ x 18.83″.

The question is, how big does it have to be in pixels to be equal to a 300 DPI 3″ x 2″ image. So now we do the reverse:

3 inches x 300 DPI = 900 pixels
2 inches x 300 DPI = 600 pixels

So your image on your screen would be 900 x 600 pixels and when you print it out, you either set the image to 3″ x 2″ at 300 DPI or simply set force the image to print at 3″ x 2″ and it will automatically work at 300DPI. Do you understand what I mean by the difference of DPI for printing vs on your screen? The image on your screen is 900 x 600 no matter WHAT you set the DPI too. The only time DPI matters is when you go to print!

Now, on the other hand, your native image is a lot bigger than 900 x 600, so it would be a shame to limit yourself to 300DPI, why not go to 600DPI? If you do that, then you simply double the pixel count to 1800 x 1200 and if you print that out in 600 DPI, you would get a 3″ x 2″ print out.

You can easily do this with Gimp or any other program 🙂 Just do a regular resample or resize to whatever size you need and you should be fine.

I hope this makes sense!
Dan


So basically, you don’t need any fancy filters or effects to do this… just do a regular image resize to the proper pixel size and it’s done. I mean really, you could even do this with MS Paint! Then from there depending on the program you are using, you either set the image from within the software to 3″ x 2″ at 300 or 600 DPI and print directly, or if the open source application does not allow you to do that, use the printer settings directly to force the image to the size you want in inches and the DPI will be automatically adjusted.

Hope that helps guys!
Dan

Handy Bookmark: Help! My System is Infected with… Norton?

Handy Bookmark: Help! My System is Infected with… Norton?

What is about Symantec products that are almost as annoying to remove as the worst Adware or Spyware out there? You would think using the uninstall tool would… well, you know… uninstall it right? Pretty much anyone that has worked extensively in Windows repair can tell you that Symantec Norton products most definitely do not completely re-install most of the time and Symantec knows it. So tonight my next useful bookmark post is a link to the handy little Norton Removal Tool.


This tool will completely nuke all Norton 2009/2008/2007/2006/2005/2004/2003 products, Norton 360 and Norton SystemWorks 12.0 from your computer. (Note: this list updates as new products are added to the removal tool – duh) Download it by clicking HERE.

Enjoy!
Dan

Vista Service Pack 2 released

Vista Service Pack 2 released

Although the Service Pack hasn’t made it to Windows Update yet, you can now grab the official downloads from Microsoft’s Download Center. The installer includes Service Pack 2 for both Windows Vista and Windows Server 2008, resulting in a 348.3MB file for 32-bit version – and a 577.4MB file for 64-bit version.

Despite the massive file size, however, there’s not much to get excited about. The update mainly includes all of the bits and bobs that have been released since Service Pack 1, although this doesn’t include Internet Explorer 8.

Enjoy!
Dan